This is the first article in a series of articles about my DIY approach to wall-mounted home automation dashboards. This is a bit old news for us, as I completed this project 2 years ago. I didn’t want to write about it immediately after completion, I wasn’t sure how reliable the whole system is. However, today, two years later, it’s still 100% operational, so it’s time!
The objective
After we moved to a new house, I mentioned in passing to my wife that I would like to be able to control the various aspects of our house from a wall-mounted touch panel. To my surprise, this idea was well-received, and in fact the scope of the project become much larger than I initially planned. So we wanted:
- Wall-mounted panel in each room (4 bedrooms, kitchen, office and playroom)
- Ability to call each room from any other room (intercom)
- Ability to control lighting, AC, security system from select locations.
- Ability to see outside CCTV camera feeds from other locations.
- Ability to see miscellaneous stats (temperature, humidity, etc.)
After I researched commercially-available options, it became very clear they are all way beyond our budget. So DIY was the way to go!
The wiring
I knew that no matter what I do, the wiring is something that is most difficult to change later, and I wanted flexibility for future changes and improvements, therefore I pulled CAT-6 from a wiring closet in my basement to the designated tablet location in each room (this is a project all in itself).
The tablets
After much research, I decided to buy the cheapest available “decent” Android tablet as the main system ingredient: I bought 6 of Teclast P80h. These were $70 apiece directly from China, a bargain for a 8" tablet. In hindsight, I should have bought something a bit better, as the hardware proved to be a somewhat finicky, and the mic/speaker quality was way below expectations. On the other hand, today, 2 years later, they all still work and fill their function, and they are all on 24/7.
Powering the tablets
Power is one major hurdle:
- I didn’t want the unsightly wall warts and long hanging wires near each tablet.
- I couldn’t put the power adapters inside walls: it’s not up to code, and a fire hazard,
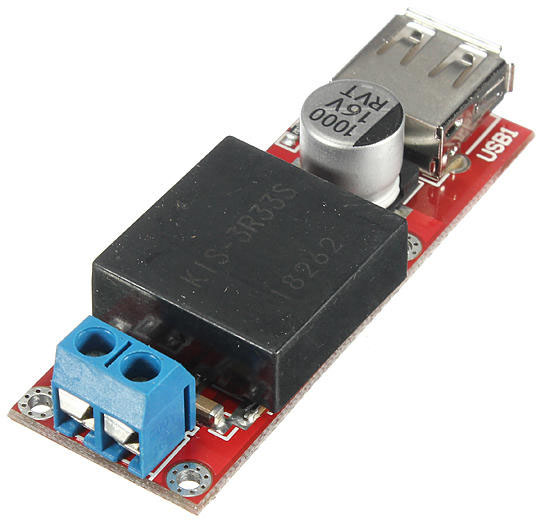
- I couldn’t pass 5V directly to each tablet from a central location because of power losses inside the wires: Using the voltage drop calculator, it is clear that using 3 stands of CAT-6 (23 AWG copper) and 5V / 1A, I’d lose more than 25% of power inside the cable at 100 feet distance, so this is a no-go. Also, the power loss would be very different depending on the length of the run, so I couldn’t just use a higher-voltage power supply.
DC/DC power supply approach
I decided to use a 24V / 5A power supply down in the basement, pass 24 volt DC via these CAT-6 cables and use a high-efficiency 24V -> 5V DC/DC step down power converter at each tablet location. These are less than $5 each and work great! From the power loss perspective, this is much better than direct 5V, less than 2% is dissipated in the cable. I put them right into the wall cavity and bought short right-angle USB-A -> MicroUSB cables to connect everything neatly.
Mounting the tablets
Commercial solutions for mounting tablets were also ridiculously expensive. I just took a small piece of plywood, glued a few strips of oak, drilled a large hole in the middle to pass through the cables and the power adapter. It became this:
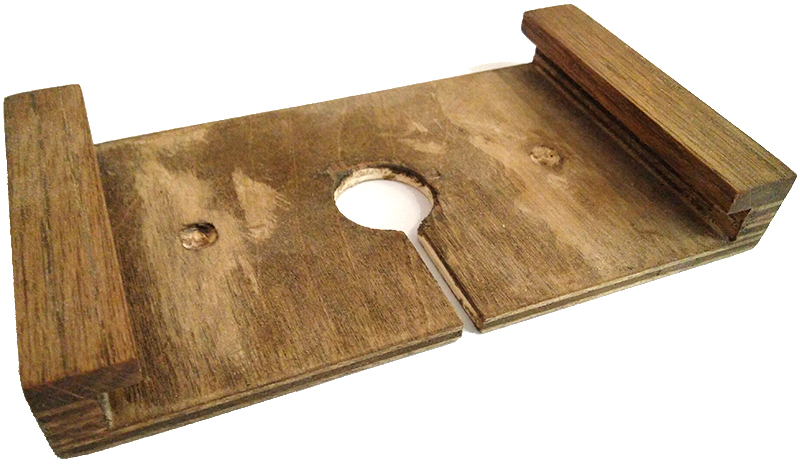
- Easy to mount to the wall: just screw it through to the wall bracket.
- Easy to route the USB cable for power (see the cutout in the middle and a “channel” to the right.
- Tablet just slides in, easy to remove if needed.
- Easy to make, I built 6 of these in a few hours.
In the hindsight, I should have painted it all white, rather than going with that “natural oak” look, but it still worked OK with our decor.
Here’s a short video of how it all works together:
What’s next?
Part 2: Software on the tablet.